Let me start by saying that I’m not a developer, or have any experience with designing electronics, but I’m what I like to call a Lazy Engineer(tm). I have the goal of automating repetitive tasks in order to find the time to automate tasks in order to become lazy. Maybe one day I might even try to automate the automation.
Last year I decided to start growing my own vegetables. Nothing fancy, just a few tomato plants, but I managed to harvest some tasty treats throughout the summer with a bit of dedication to water and care for the plants.
That got my lazy sense tingling. How could I automate the growing of vegetables? Could I use this to expand my garden to include other varieties? I like to call this goal – Vegimation!
I decided to start by breaking my idea down into 4 parts:
- When to know when to water the plants (INPUTS)
- How to decide whether to water the plants (PROCESSOR)
- How to get water to the plants (OUTPUTS)
- How to power the devices (POWER SUPPLY)
Inputs:
I wanted to keep my first project simple, so I started off with just a few sensor inputs.
- Soil moisture – How do we know whether our plants need watering?
- Temperature – How hot will it be today? (not strictly needed)
- Light – How much sunlight are my plants receiving?
- Weather forecast – will it rain later on today?
Processors:
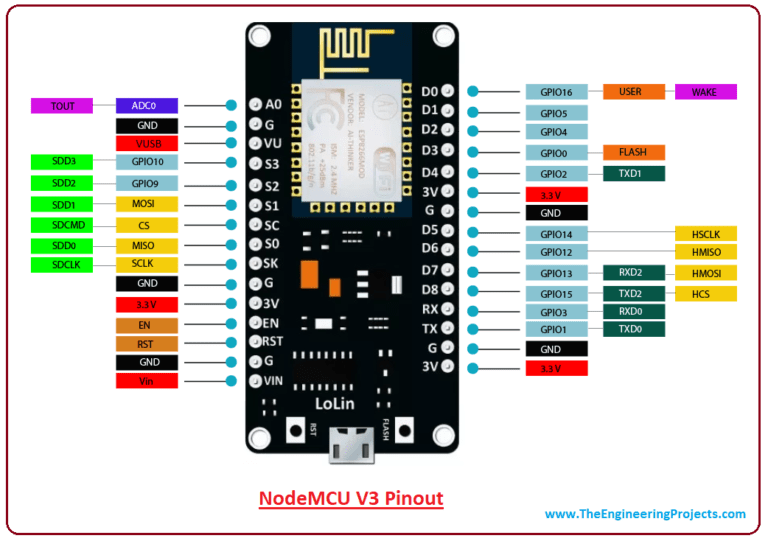
After a little research on Reddit and Aliexpress, I decided that the NodeMcu v3 (ESP8266) would be a good choice to base my automation around.
Pros:
- It was cheap € 1,88 LINK
- It had built-in WiFi
- It works with the Arduino IDE
- It can draw as little as 20μA in deep sleep mode. Paired with a 3000mAh battery, this could last 6.7 years on a single charge!*
- It has 1x 10bit Analog input – more on this later.
* (IoT battery calculator) Obviously this is theoretical and doesn’t take into effect the loss via the low dropout regulator and the conditions of the environments on the battery.
Cons:
- It doesn’t fit into a standard bread-board
- It comes with the 5v -> 3.3v AM117 voltage regulator, which has a high constant quiescent current (~4mA – even when the board is in deep sleep). In order to get the lowest possible current draw, we will have to remove this regulator and power our board via the 3.3v pin directly.
- Deep sleep mode will cause your code to terminate from the point it goes into deep sleep. When the board wakes up, it will start your code from the beginning of the sketch again*
* There are ways to persist a small amount of data in storage, but it’s a little more involved.
After spending some time with the NodeMCU and understanding the pros/cons of the device, I’m realising that it might have been a better option to go with the newer ESP-32 variant (see here). Maybe that’s an option for a later project.
Sensors
Now, here’s where you can open Pandora’s box! There are hundreds of different sensors available for Arduino’s and Arduino type clones. Some of them run with only 3.3v, some work with 3v – 5v and some only operate at 5v.
<WARNING!>
Make sure you know what logic level voltage your sensor requires, before connecting it to your device. You can destroy your NodeMCU and/or sensors
</WARNING!>
After deciding what I wanted to monitor in the environment, I found the following sensors to suit my project:
- BH1750 Light Intensity Light Module (i2C connection)
- Capacitive soil moisture sensor V1.2 (Analog)
- DHT22 digital temperature and humidity sensor (1Wire)
- Rain sensor (Analog)
After connecting the sensors and writing a few example scripts, I realised that I may have made some hasty decisions with my sensor purchases:
The BH1750 is a great little sensor. It is simple to use and connects to the NodeMCU via the i2c protocol (i2c is like USB for Arduinos). You can connect many different sensors (up to 1023 devices with 10-bit addressing) using just 2 pins on the NodeMCU (SDA and SCL), greatly simplifying the design.
KEEP
The Capacitive soil moisture sensor is a great addition to the suite of sensors. No metal contacts actually come in contact with the soil, so it should be protected from the environment, unlike some other moistuer sensors that have bare metal connectors. It’s marketed as working between 3.3 – 5 volts, but after a few days of testing, I’ve not managed to get it working with anything less than 3.6v. This means that 3.3v powering the NodeMCU is not enough to drive the soil moisture sensor.
BIN – although I may have a dirty fix.
The DHT22 is a cheap sensor that has been used in many Arduino weather stations due to it’s low cost and simple library. However, the temperate sensor only updates once every 2 seconds and it regularly fails to initialize upon powering up, returning “NaN” values instead of the actual temperate. The only way to fix it is to disconnect then reconnect the data pin of the DHT22 sensor while the NodeMCU is running.
BIN
The Rain sensor – basically two separated metal tracks (+/-) mounted on a PCB. Not sophisticated, but definitely reliable. Plug one end into 3.3v and the other into Analog Input pin and you have yourself a moisture sensor.
KEEP
Power Supply
The NodeMCU runs on 3.3V, with an AM117 linear voltage regulator doing the conversion from the +5V (USB power) to +3.3V Vin. This setup will be fine if we are happy with power cables leading up to the plant (and don’t care about the constant 4mA drain from the AM117). But since these are going to be outside and I don’t want cables running around the garden, I want to find a way to power it via batteries.
AA Batteries
We can use standard AA (1.5V) batteries in a few different ways to drive our NodeMCU. Good quality AA batteries have around a 1500mAh capacity.
2 x AA batteries in series to give us 3V (which is just enough to drive the NoadMCU) / or we can use a boost converter circuit to increase the voltage to 3.3V. (3000mAh)
Use 1 or 2 x AA batteries in parallel with a boost converter circuit to increase the voltage from 1.5V to 3.3V (1500mAh/3000mAh)
Lithium-Polymer (LiPo) Batteries
LiPo batteries are used in the majority of battery powered devices and could be a good choice to power your project for a number of different reasons.
- High energy density (3300mAh)
- Cheap (2-3 Euros)
- Relatively flat discharge curve of around 3.8-3.7V
- High current output / charging
